Introduction
NEXI uses TLS encryption to ensure secure transmission of request and response data as well as for notifications sent from NEXI to your system.
Therefore request and response is encrypted either with Blowfish (default) or with AES encryption (upon request at NEXI). The blowfish / AES-password is provided after NEXI completed setup of your MerchantId.
Additionally sensitive data like MerchantId, amount and currency are hashed with a separate HMAC-password using SHA256-algrorithm.
To check your implementation we provide a tool
-
to validate MAC-value (API-parameter MAC)
-
to validate Len/Data value (API-parameter Len and Data)
You will find a short description how to use this tool.
Usage
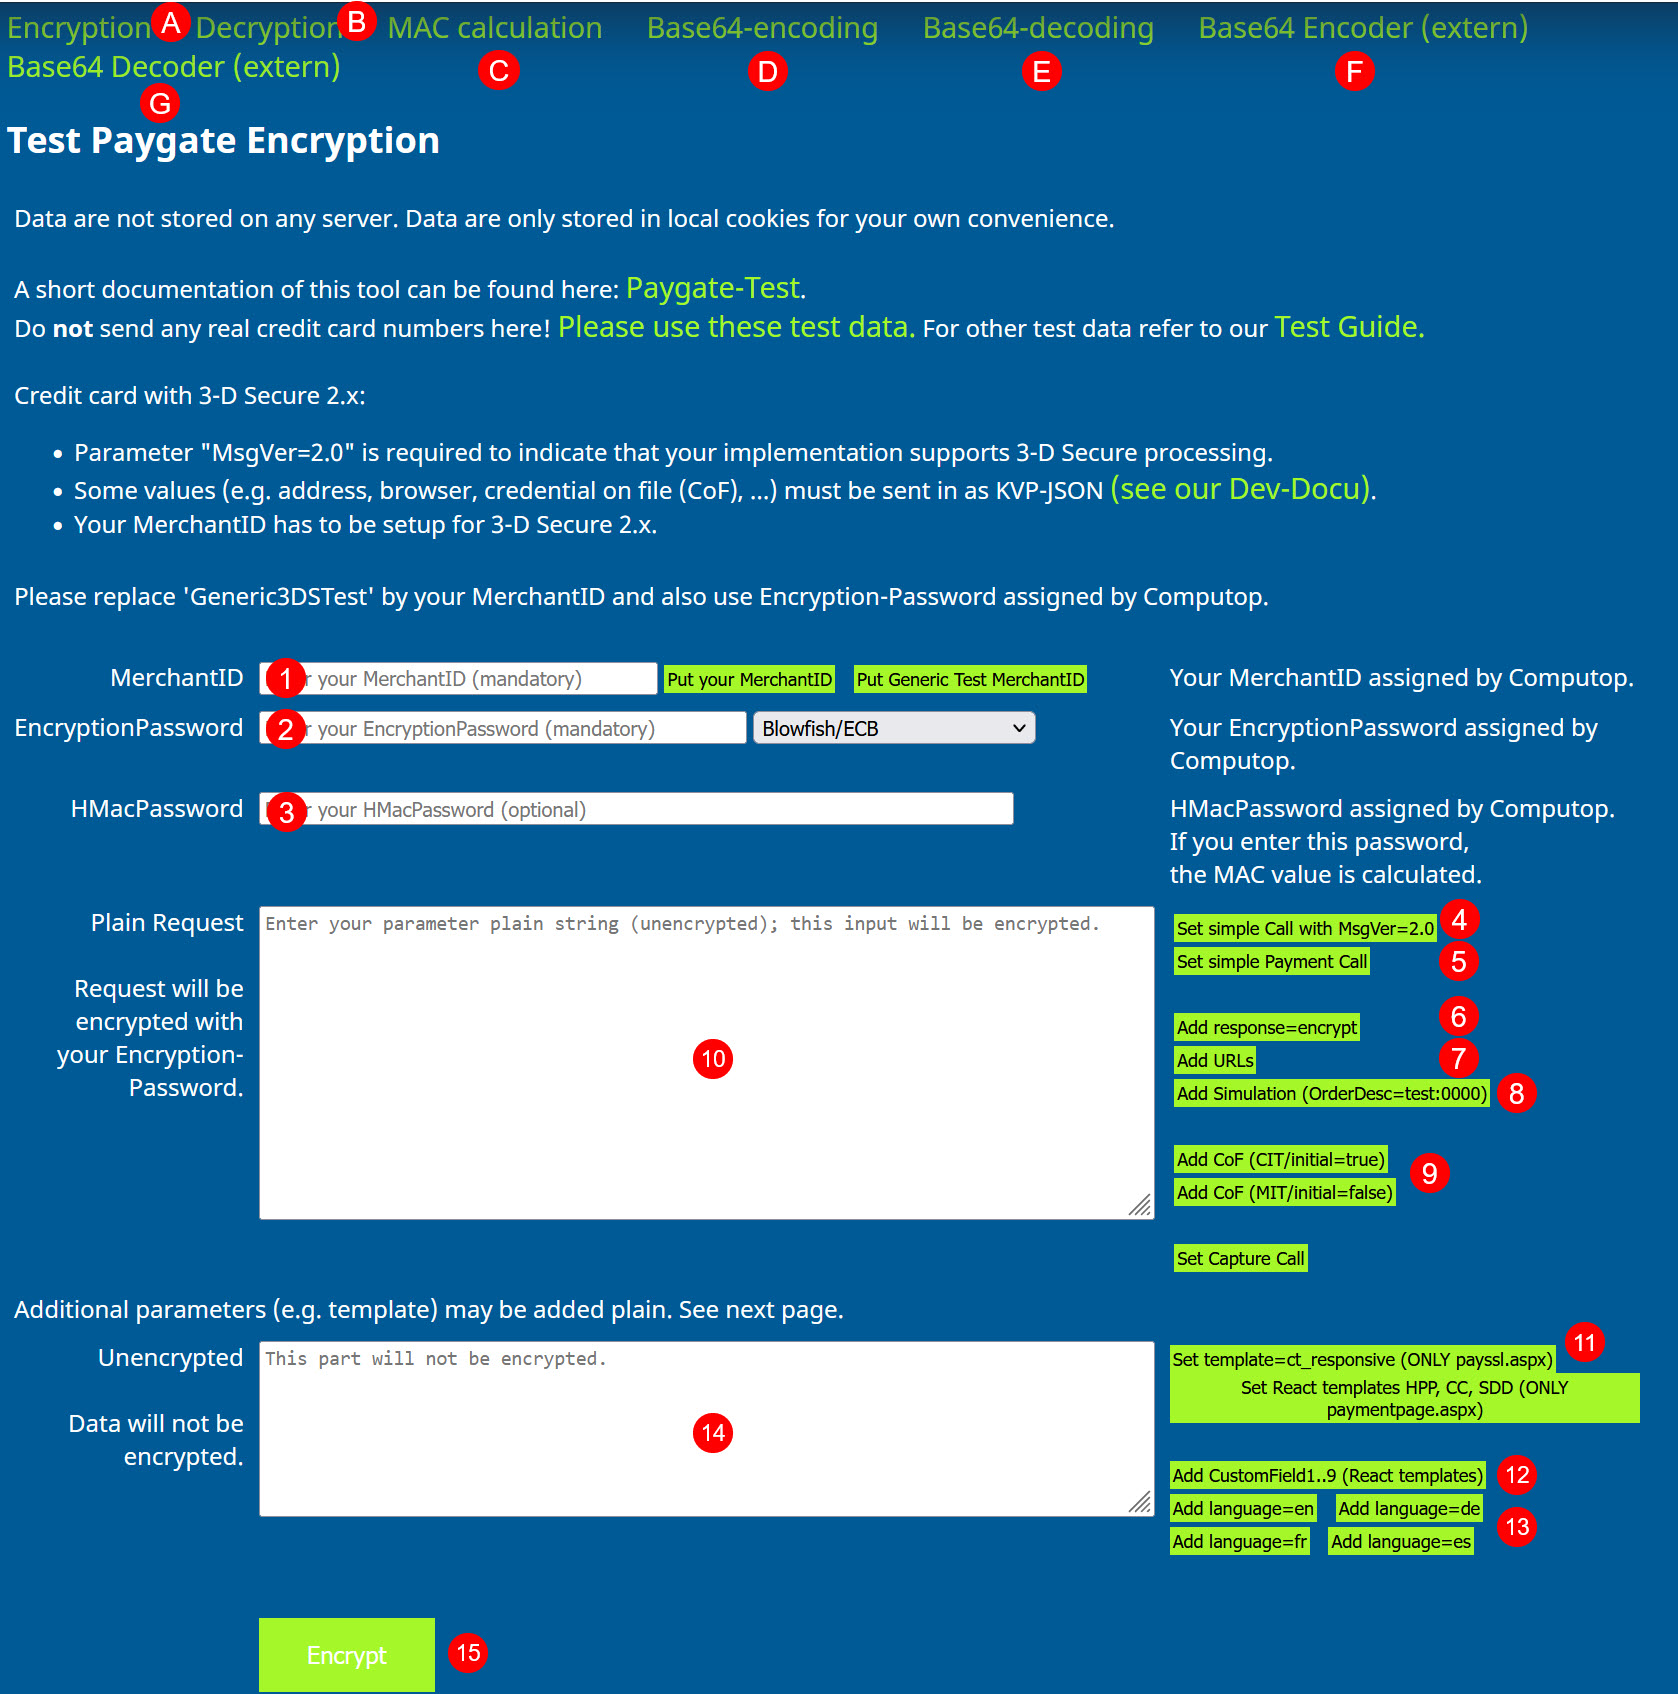
The tool itself will start like this:
Building an encrypted payment request
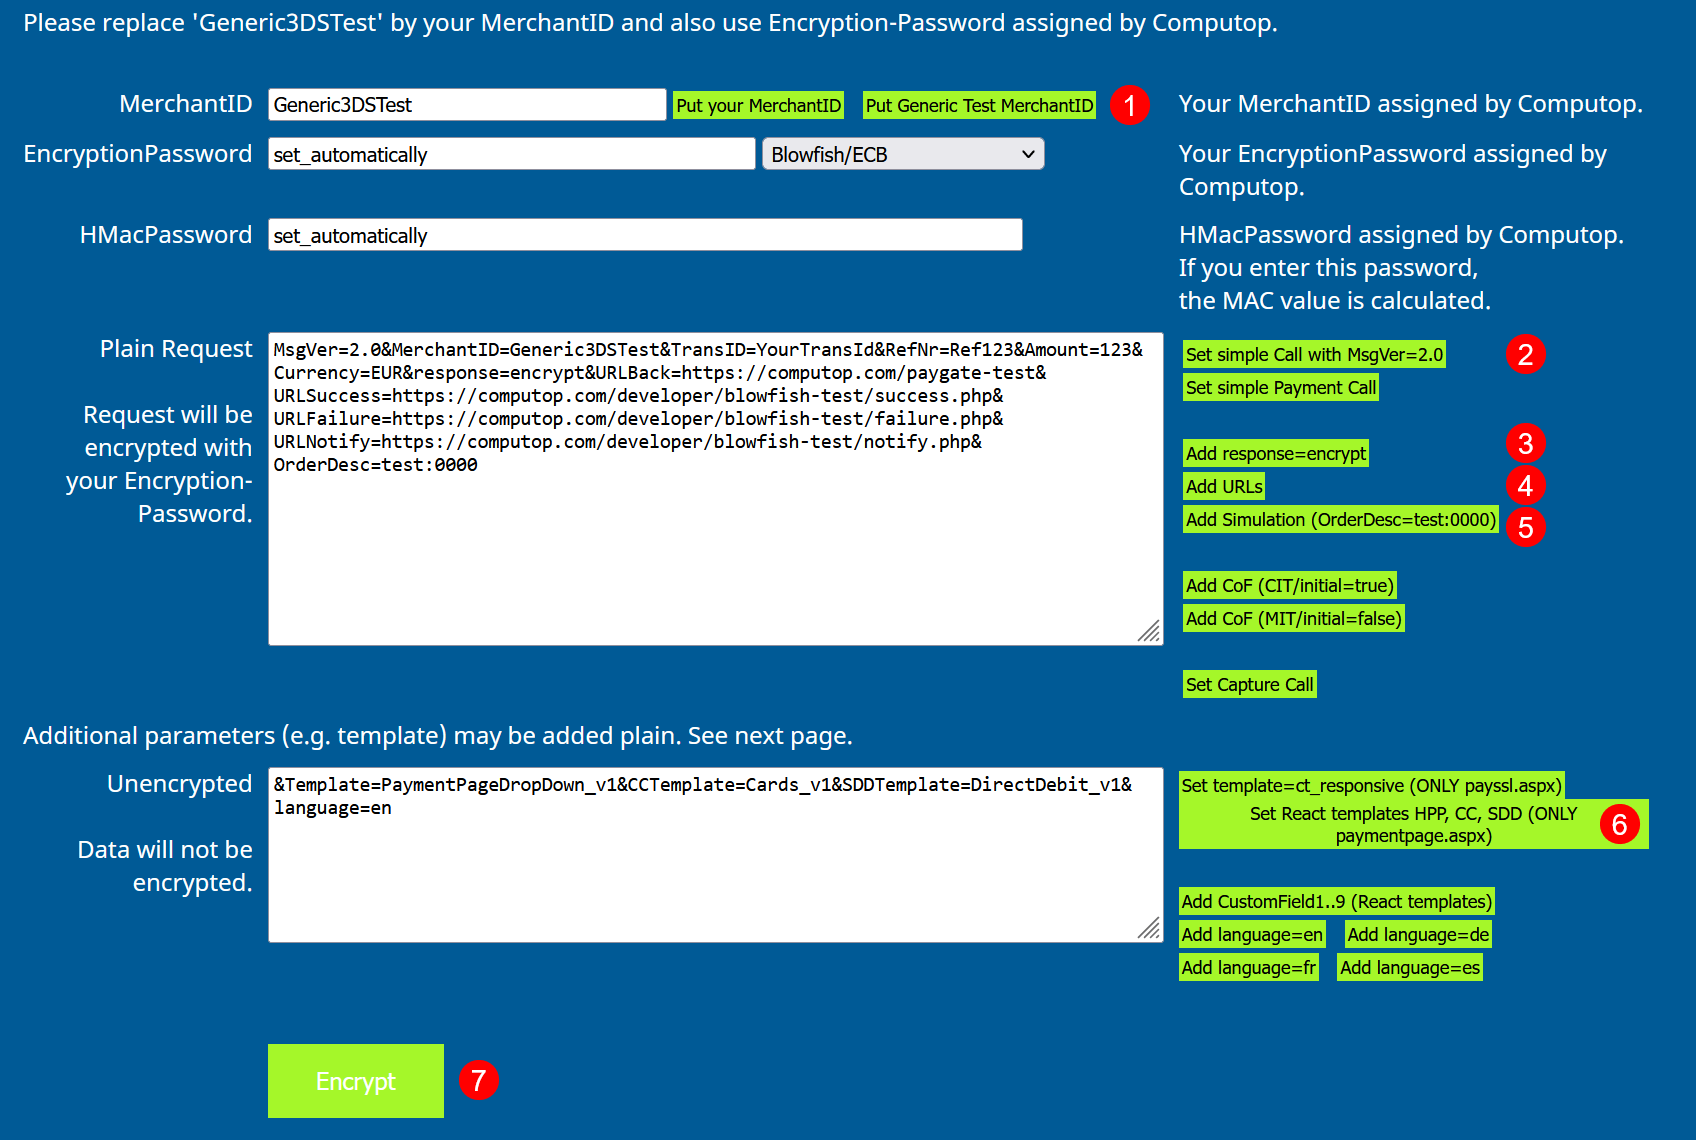
If you already have a NEXI MerchantId, encryption-password and HMAC-password, you can enter them into fields (1), (2) and (3). You may also choose Blowfish or AES encryption, Blowfish is default and AES needs to be enabled by NEXI.
Then you start creating a basic request
-
for creditcard requests using 3-D Secure 2.x with button "Set simple Call with MsgVer=2.0" (4)
-
or simple payment calls (e.g. PayPal) with button "Set simple Payment Call" (5)
If you want an encrypted NEXI-response pls. add parameter "response=encrypt" with button "Add response=encrypt" (6).
If you want to use payment methods with forms or redirect you have to provide URLs, too. Some sample URLs can be added with button "" (8).
To enable simulation mode (i.e. no downstream-systems are required) pls. use button "Add Simulation (OrderDesc:0000)" (8). By using this option you can simulate all response codes just by replacing "0000" with your desired one.
To add additional parameters e.g. for recurring payments which are customer or merchant initiated NEXI supports credential on file which can be added with button "CoF (CIT/initial=true)" (i.e. customer initiated, initial payment) or button "CoF (MIT/initial=false) (i.e. merchant initiated, subsequent payment). These key/values are sent as base64-encoded JSON-values. A list of JSON-objects can be found here.
After putting a basic payment request together you may modify e.g. amount from 123 (i.e. 1,23) into another value or change the currency from EUR (i.e. USD) - depending on your paymethod setup.
Adding unencrypted parameters to payment request
NEXI also supports payment forms - so the consumer can select a payment method or directly enter credit card or bank account data.
These payment forms use unencrypted data to
-
modify their background or font color
-
or display a merchant logo - depending on the template
-
or select the template you want to use
Adding additional JSON parameters (base64-encoded)
Mostly for credit card payments additional parameters like e.g. browser information or external 3-D Secure data may be used. These are base64-encoded and then added to the field (10) for "Plain Request".
Therefore form "Base64-encoding" (D) can be used which already provides some samples in NEXI-JSON format.
Base64-encoded values are also sent as key-value-pair:
-
e.g.: credentialOnFile=base64('{"type": { "unscheduled": "CIT" }, "initialPayment": false }')
-
will be sent as: credentialOnFile=ew0KICAgInR5cGUiOiB7DQogICAgICAgICJ1bnNjaGVkdWxlZCI6ICJDSVQiDQogICAgfSwNCiAgICAiaW5pdGlhbFBheW1lbnQiOiBmYWxzZQ0KfQ==
Using predefined MerchantId Generic3DSTest
You can simply try and use a NEXI predefined test MerchantId "Generic3DSTest". You don't need to know Blowfish- and HMAC password, because the tool is already prepared to use it. Just keep the dummy value "set_automatically" in place.
Encrypt and send request
After you have built your plain (unencrypted) payment request and eventually added some template parameters by using:
-
button "Set simple Call with MsgVer=2.0"
-
button "Add response=encrypt"
-
button "Add URLs"
-
button "Add Simulation (OrderDesc=Test:0000)"
-
button "Set React templates HPP, CC, SDD"
you are ready to go.
After pushing button "Encrypt" (7) the payment request is built and encrypted and shown on the next form:
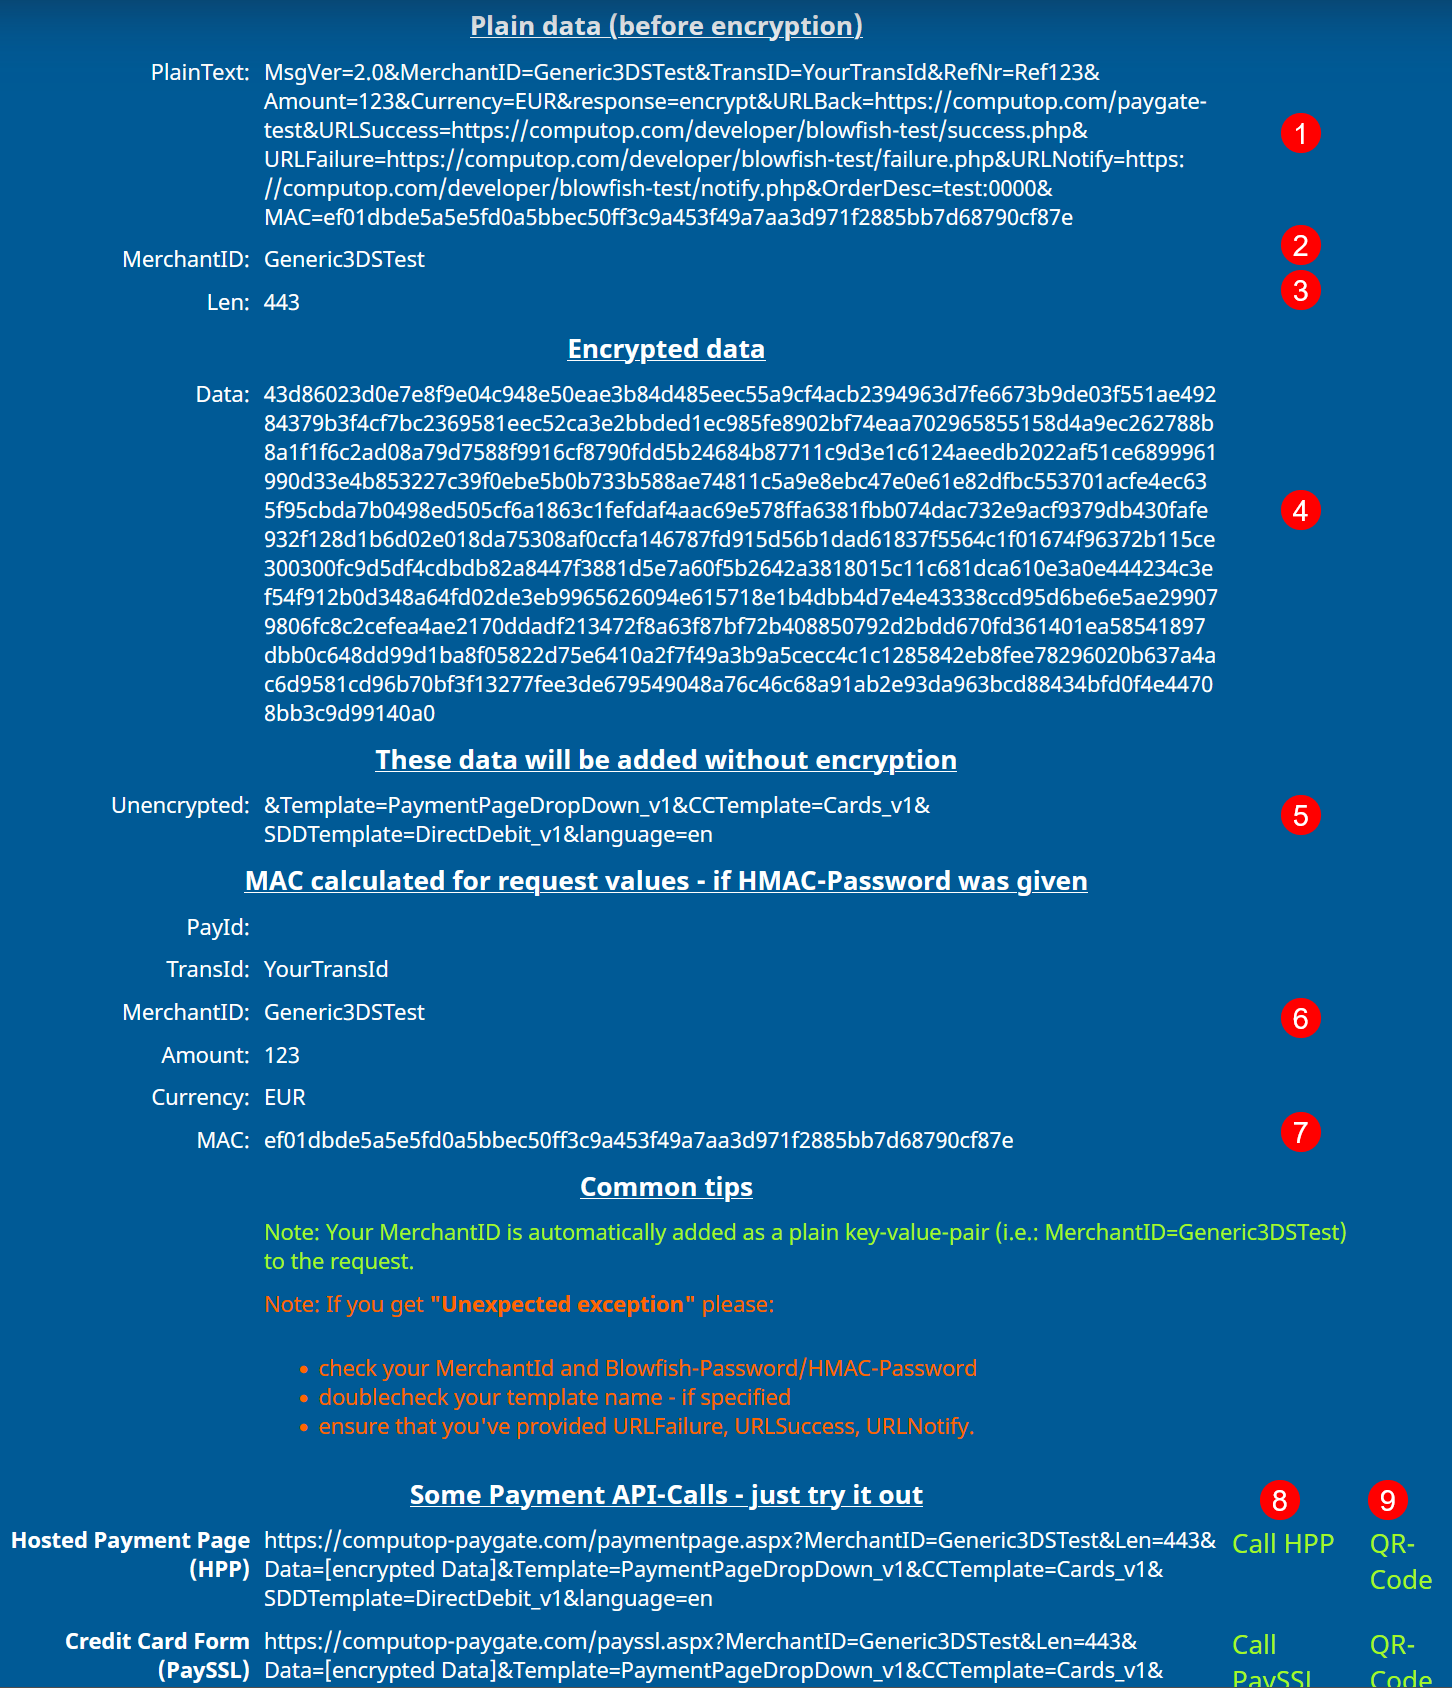
Here you will see:
-
(1) plain request data which will be encrypted into Len + Data
-
(2) your MerchantId - or the NEXI default one
-
(3) value for parameter "Len" of encrypted request
-
(4) value for parameter "Data" of encrypted request
-
(5) additional request data which will not be encrypted
-
(6) values that are used for HMAC-calculation
-
(7) the calculated HMAC-value itself
-
(8) finally a button to initiate the payment request
-
(9) or a button to show a QR-code which can be scanned by your smartphone to initiate a payment request there